how to draw 3d breasts
How to depict a body with shadowing
eight,968 views
Introduction
Hey-hey, and welcome to the 2d guide fabricated peculiarly for Prune Studio Pigment TIPS. First of all, for a complete understanding of the process I would recommend watching the attached video with the same guide. There I explain every single stride as well with subtitles available.
So, this time I am participating in "Shading techniques" category and today I am going to share something really useful with you. Now, I'd like to brand an important remark: though this method is practically set for this guide, I myself am still developing it. Certain, I would prefer sharing it with you when it is 100% ready, but due to the time restrictions of this contest I take to become with what I take. Don't worry, information technology will not be an unprepared unfinished guide with incomplete techniques, the method is ready at the land where it is and tin exist used for your artworks, I will but update it a bit once I finish its developing and once I chief information technology. So, here we become.
We are going to describe a shape of a girl'south torso primary using fill in instrument and shading with a bit of lighting merely. This technique is very useful, convenient and someone might fifty-fifty call it "cheaty", but here is what I think: a homo sapiens could call easel, brushes and paints cheating also, so if y'all accept an instrument that tin aid you reach a certain goal – use it!
And one more thing: y'all CAN use this method in other graphics editor, but its full potential and convenience of using can be released but in Prune Studio Paint cheers to some of its sectional features. You will empathise that soon.
Place a model
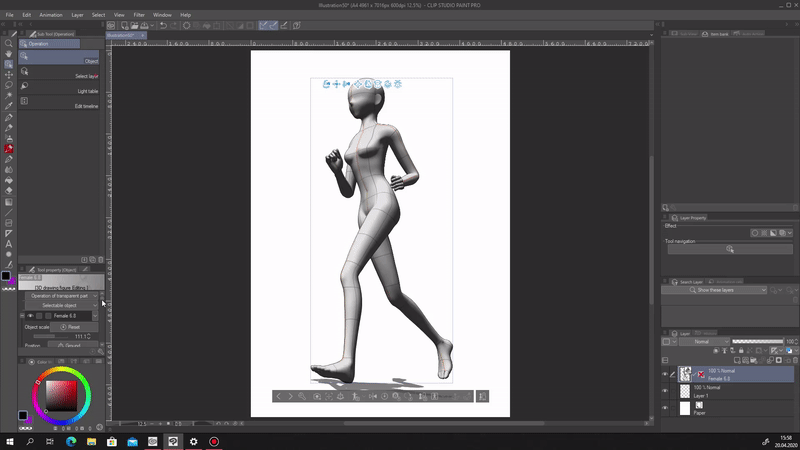
First, create a new sail. I'd recommend using an A4 preset (in either horizontal or vertical proportions) since it is optimal in the way of resolution and sides' sizes. But certain you lot might employ whatsoever parameters you want. Once washed, yous volition need to import a 3D model the name of which is "Female 6.viii" - it tin can exist downloaded in Clip Studio assets. I would advise to use the same materials as I am and so you would take a clearer agreement of every action. Default Clip Studio models or other custom models are possible simply remember that my method of shading was developed specifically for more anime-similar mode.
Press on the push button as on the screenshot beneath and choose "Use 3D Pose Textile" which will pb you lot to the library of registered poses for models. Choose the one you like (again, if you are reading this for the get-go time, it is recommended to follow my deportment every bit close every bit possible, so you might choose "Run with toes inside left front" pose). Press OK and the pose will be applied to the model.
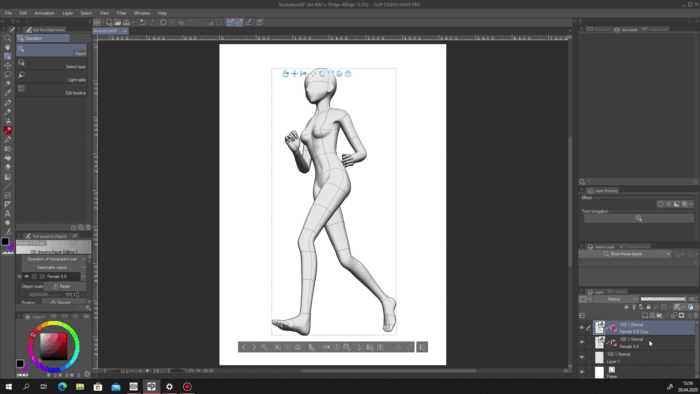
Alter the angles and altitude from photographic camera until you lot receive the needed foreshortening.
Go to "Operation" section and, if y'all did non customize your interface by dragging some of its elements to unlike places, motility to the "Tool property" field right above your color palette. Find there the light source and shadow preferences. Turn the shadow off, nosotros don't need it now. So elevate the light source across the sphere to change the way the light falls on our model (if your device is powerful enough, switch the "Display Settings For Editing" to Normal style so you could run across the changes on your model immediately). Such a real-time low-cal source work tin can be performed in Clip Studio merely, that is why information technology would be hard to work in a dissimilar plan since you would need to observe a 100% perfect second reference model which is really hard.
Once you are satisfied with the shadows and lighting (they should match the ones that should be on your art), you can also adjust the overall anatomy of the model, though this function is optional.
Duplicate the layer with the model and apply "Display Decrease Color" to whatsoever of them. Lower the color threshold to any number from 1 to ten. Return to the "Tool holding" and set the outline width from 12 to 21 approximately (this option is right to a higher place "Display Settings For Editing").
At present drag the layer with model you did nada to and identify information technology on the very acme. Lower its transparency to thirty.
Create a new layer with Multiply preference. Select the auto select tool with "Refer to Editing Layer But" preference and go back to the model that is lower in the layers list. Select the expanse inside the model (don't select the outside area and invert it or you will select elements that should not be).
Brand certain y'all've selected everything within the borders and expand the selected area by 4 (if you are using a smaller or bigger resolution, y'all will demand to modify the expansion number of pixels accordingly). Return to the layer with Multiply preference and fill it with the pare-like color you want your character to be.
Create a binder and put a new layer in it – not the i we've only filled. Both binder and layer should be with Multiply preference as well. Afterward that option a color you volition utilise for shading. It should be at to the lowest degree a chip darker than the ane nosotros used for the filled layer and should correspond the chosen gamut (in case you are not making information technology expect contrast on purpose).
Shadowing
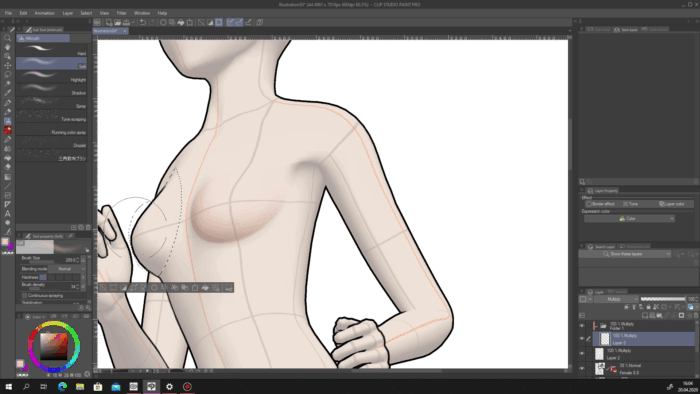
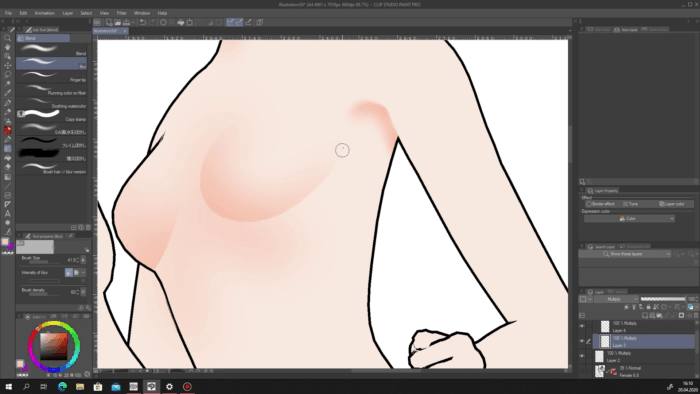
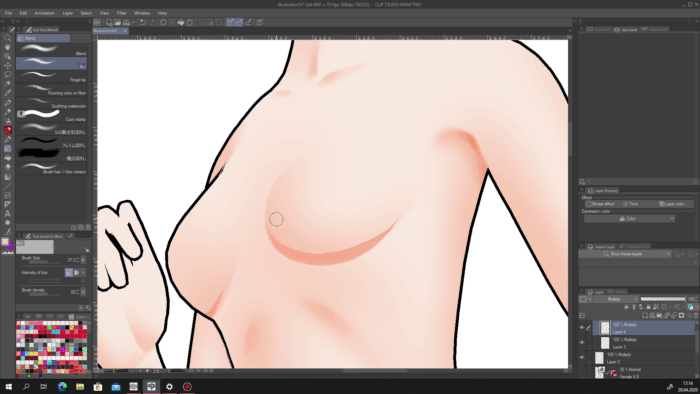
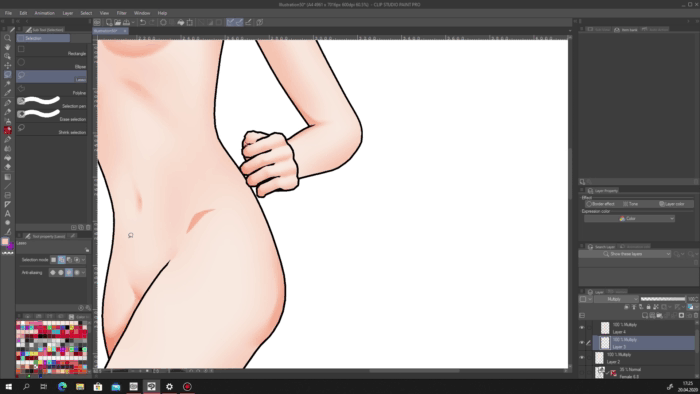
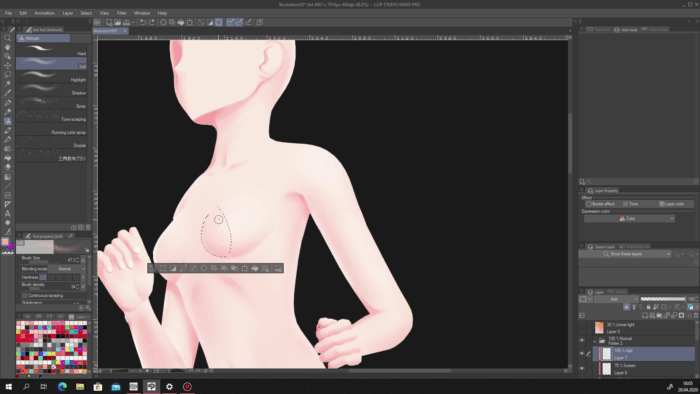
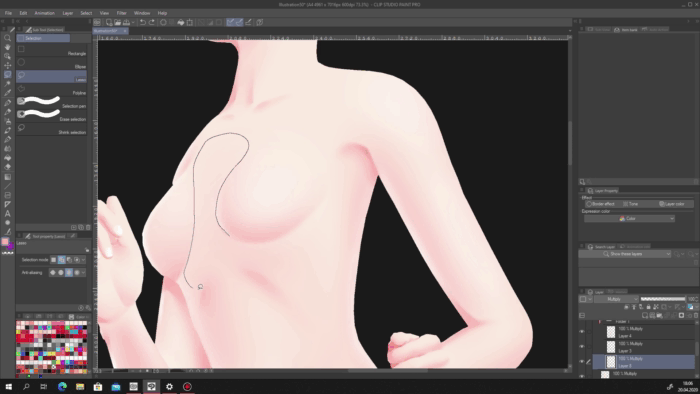
In one case you are washed, utilize the "Clip to Layer Below" preference to the folder. I decided to start with her chest, so accept lasso and select her breasts carefully, so y'all would receive a round and smooth shape. The models will guide you, follow their shadows and lines.
Pick the smooth airbrush and endeavor to imitate the shadow of the model on the background repeating the lines, curves and shadows.
This is what this method is special about – near all yous need to shape a complete character is shadowing. The pick in this case is needed to show the edge between the breast and the rest of the body. This technique is extremely unproblematic to learn, though a bit harder to master. Besides, it lets anyone to implement their own details like a way of laying shadows then on. Information technology is likewise a perfect method for young artists since they don't have to bother with the complexity of human beefcake. Or rather they do need to know information technology in social club to show the inner elements of the silhouette we have, but still information technology saves a lot of time. And cheers to the Prune Studio 3D models instruments, you lot tin can brand a body with any kind of anatomy and proportions.
Repeat the aforementioned process with the other breast. Call up taking into account the light and shadows on the background models. As well, remember almost of those models are not perfect or exact, so sometimes you will need to think: "what else here might be?" or "is a shadow at that place should be laid a bit differently from how the model shows it?". During this guide, I will emphasize the moments when I was choosing a bit dissimilar means of shadowing.
Likewise, at that place is an important note: since we turned the "Clip to Layer Beneath" on, nosotros will use selection only when we need to make borderlines Within the silhouette, which ways y'all don't have to exist accurate when the pick line goes beyond the torso'south border, like in this case with the second breast.
Create another Multiply layer within the folder. Nosotros will use information technology when we demand to shadow but not to mesh it with the shadows nosotros already have in the same place. You tin can also distinguish those layers by the way of using. For example, during this work I used the 2nd layer in the folder for smaller and more than concentrated shadows, while the first layer was used for big shadows that go through a certain part of the trunk. Like I did here when I laid the principal shadow on the chest.
If you are going with such sectionalisation like me, then take a expect at the whole model and decide what shadows would go to which layer since I will non be proverb " become to the beginning layer…" or "switch to the 2d layer…" anymore, this might misfile you.
When yous are working with places with deep and concentrated shadows, you can get ahead and fill those areas like I proceeded with the chin, head and other such parts.
As you can see below I am adding a smoother shadow to practically the aforementioned place where a strong shadow is already laid. Such a double-layered shadow will make your work more detailed and will emphasize the beefcake – two birds with i stone. I will besides echo this pocket-sized technique a few times today.
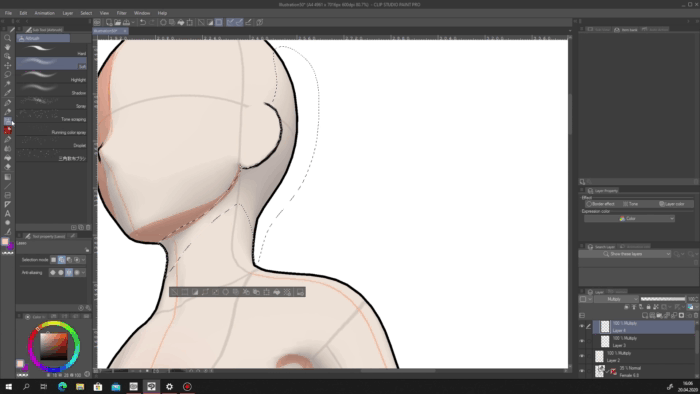
Have the standard Mistiness brush and mistiness the border of the strong shadow on the mentum that is closer to the neck. The mistiness the upper edge simply with lighter strokes since this part of the body changes its angle sharper. Also blur the smooth shadow's edges with strong strokes if you have some afterward removing the choice.
Nose is more interesting: The closer to the tip, the sharper the shadow should. And the farther information technology goes to the brow the more than you should mistiness it. The aforementioned with the lower one-half of the confront.
After that add a triangle-similar zone with light shadow where the nostrils are. A couple of simple actions and the basement of your character'southward face is ready without even sketching!
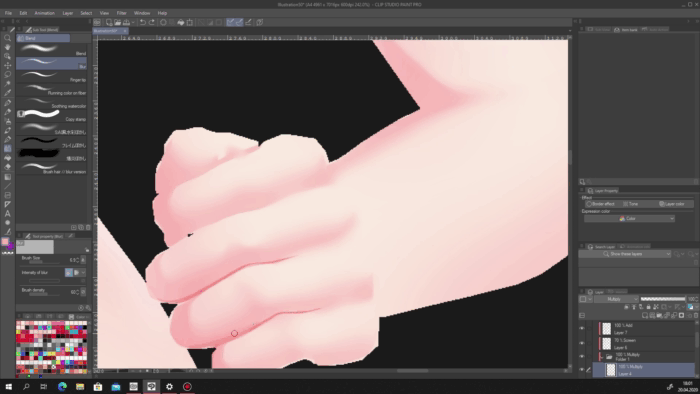
Move to the armpit. A strong shadow should be there, only only its "lower" side should be blurred. The upper one is an essential part of the arm edge, simply a really smoothen blurring should be applied to it.
Return to the breasts and blur their lower edge line a bit and so it would create an effect of a light flattening of the spherical shape. The upper should remain abrupt since it is not attached to anything.
From now on keep shadowing according to the model and not forgetting about its imperfection and possible need of your own improvements. I will add a set of pictures and GIFs that include the progression (to see the total process of how I did every single role of the body you may ringlet upwardly and watch my video).
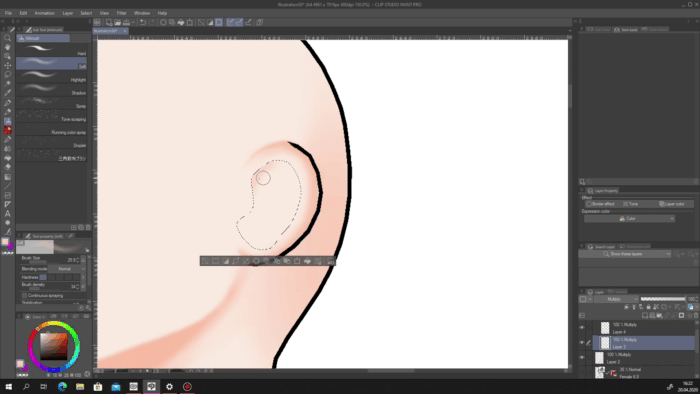
As yous tin can see, even the complex curves of ear are done with shadowing only – no sketches, no lines.
Thanks to the fact all the shadow layers are with "Multiply", their shades are summed up when I describe them on a same place, so they look even darker. Thank you to that, I could make this dark shadow line on the medial talocrural joint. This should be done due to the form of this bone – it goes sharper equally it rises, that is why the concentration of shadow on its center (in example the calorie-free falls so the shadow starts in the centre) is the deepest one.
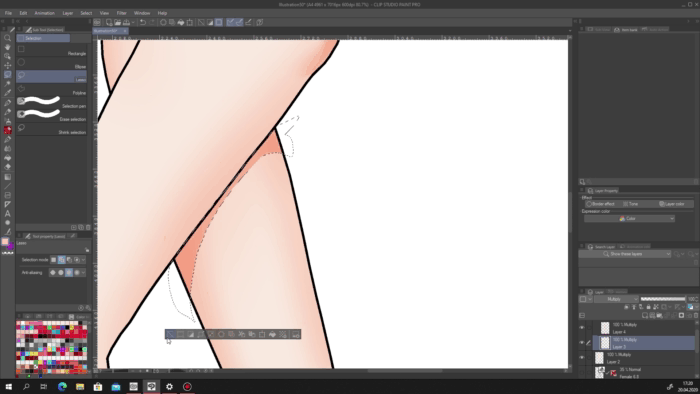
Simply like I mentioned before, sometimes you will need to meliorate the anatomy yourselves.

Yup, here I went with a triple-layered shadow, simply chin is usually ane of the near covered with shadow places.
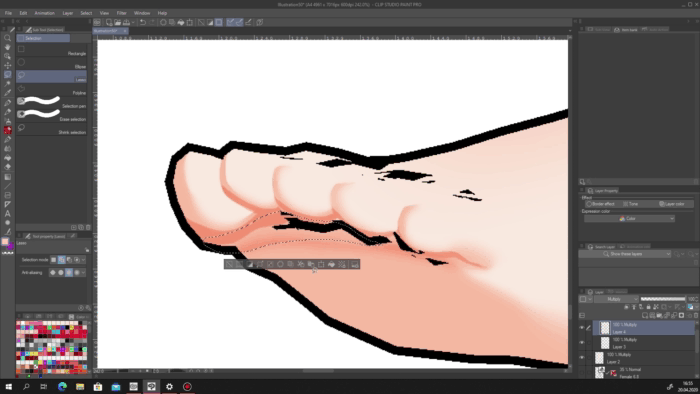

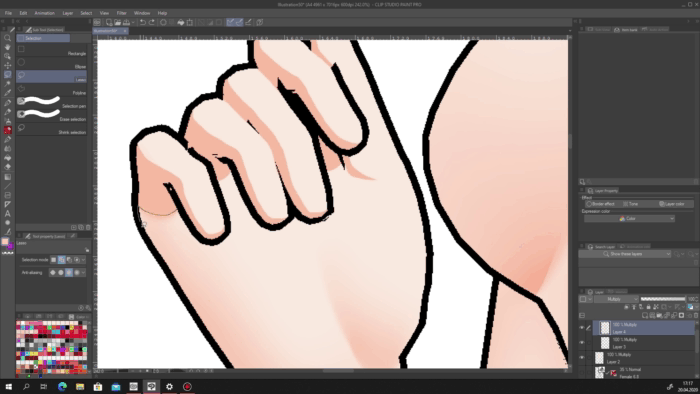
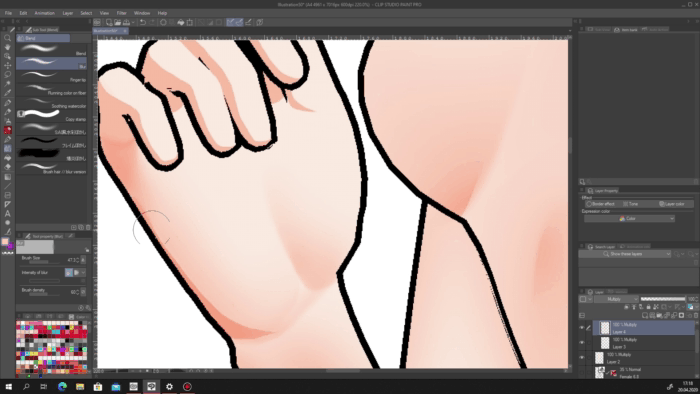
Fingers and hands were the most interesting part for me and I recall they are the best part of this concept, only we will talk about it a flake after, now just proceed with them as with the other body parts.
Add some boosted concentrated shadows to places like armpit or omphalus and mistiness them a bit. Remember about such elements.
Return to the breasts once more and add another layer of shadow to their lower parts, near the place where they are touching the chest. In this mode we are improving the perception of their shape and volume.
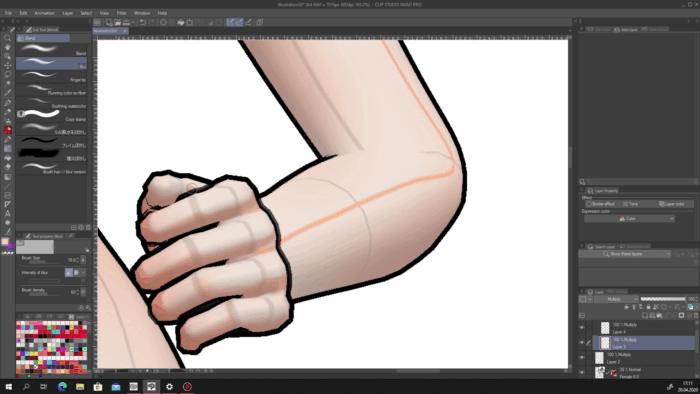
Now we have returned to the fingers. Upon adding the initial, shine shadow to them on both hands, go to your other layer and add a deeper shadow on top of information technology like you can see on your screens. Right now, pay attention to the pinkie's lower phalanx, the place where information technology joints with the mitt and the identify a bit lower. Yous can see where the finger bents, how the abrupt shadow from it lies on the hand and becomes smoother and fades. These are the elements we are going to add beyond the easily. Only this volition still be a bit later. Sorry, I just wanted to attract your attention to the pinkie to give y'all an agreement 😊
Don't forget how to brand such deep shadows I am currently adding beyond the body: y'all should depict them on a layer dissimilar from the i that already consists shadows in the same places.
If you are not sure about the gamut your character was made with, go to Edit – Tonal Correction – Hue/Saturation/Luminosity, and change its shade with the Hue scroll. Think that you are changing only one layer at in one case, so remember the number yous stopped at so you can make the same for the remainder layers.
Lighting (feat. Shadowing)
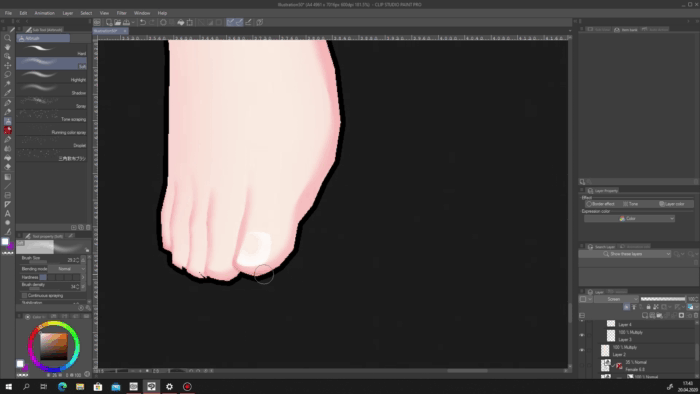
Create a layer with Screen preference above the others in the binder and with the aforementioned airbrush go through the body adding a slight glowing result co-ordinate to the trajectory your light source falls. This will let the trunk look rounder.
On the same layer, brand a few selections on the toes in grade of nails, and with smooth strokes draw the nails. Simply don't fill them, let them be with a fleck of gradient effect. In fact, you can choose whatever colour for them, it is my determination to proceed with the natural ones.
On a new layer with Add together preference draw more concentrated light strokes. Add them to the olfactory organ and to some of the edges of the torso. This is a reflection calorie-free and information technology volition create a physically correct volume for your concept. Employ some airbrush, watercolor or any polish brush with more or less sharp edges. You can even use several brushes, like I did: I combined the air brush and the smooth watercolor, this volition exist conspicuously seen on the right arm.
I know the edges might expect too sharp and a bit ragged, simply the thought of this guide is to share my shadowing method with you, and this is just a concept I made for this purpose which worked for my goal. Sure I could arrive more accurate, just this is an unnecessary activity that would take boosted fourth dimension. I hope y'all empathize me.
Now we accept finally reached the part I think I did the best – the easily. To create such upshot of bending finger, you need to lay one shadow on i layer on one phalanx, and so articulation another shadow to it, merely on the next phalanx and a unlike shadowing layer. And let them cover each other a fleck in the place where the bending will be. You can see the actual process and the result yourself.
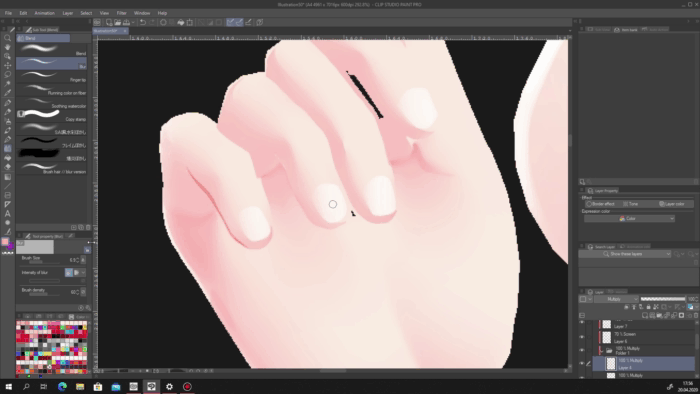
I recollect the easily are great 😊
Final Corrections
Don't forget to add the reflection light to the breasts to finish them.
Create the third Multiply layer and place them below the rest ones in the folder. Add a light shade between the breasts to make them more than visible (this is also physically correct since this is the falling shadow from the left breast).
And finally, take a look at your art. Recall what information technology might however need, or what possibly should be removed.
Basically, this is everything for now. We take but created a dandy human body with near just shadowing! There are plenty of ways how this technique tin can exist evolved or used. I showed you the basement I developed and a couple of tricks I implemented. I volition be glad to work with this method further and to share my innovations with you.
Thank yous for your fourth dimension spent with me and, once again, thanks to CELSYS for this competition and the possibility of finding and sharing advices. Soon I will revive my Clip Studio Paint guides on my channel and volition definitely be participating over again!
Users who liked this postal service
Source: https://tips.clip-studio.com/en-us/articles/3037
0 Response to "how to draw 3d breasts"
Enviar um comentário